Mastering Mural Photographs
Hi! Today, I’m going to go over photographing outdoor murals and art—something that someone has created as a picture—and we’re going to take some photographs of it. I’ll share some things I like to think about when photographing a mural.
I’m here at a school in SoCal, and this mural is the mascot for the school. So, how would I photograph this mural? One idea is to shoot from a really low angle. Shooting low makes it look more impressive and gives it a sense of scale. If you place someone very close to the mural, you could also create a scale effect. Shooting from an angle can make the mural look dynamic.
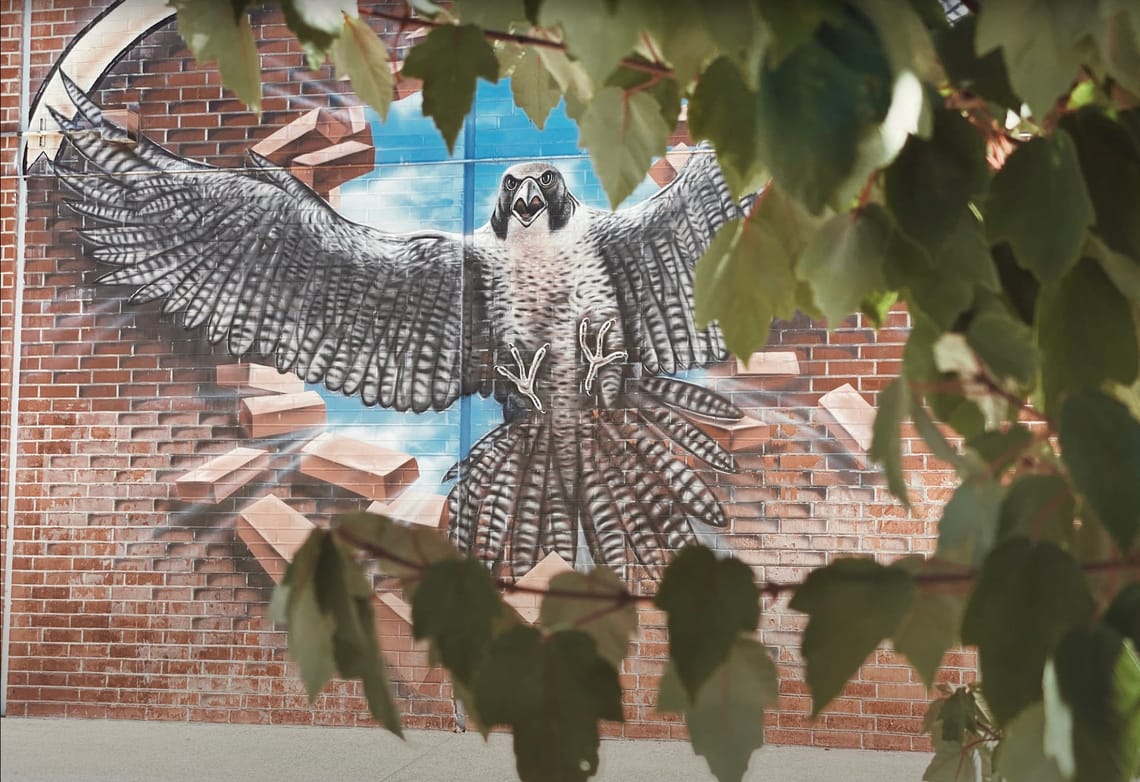
Another idea is to use the surroundings to create framing. For example, you could shoot through a tree. If you have a shallow depth of field or a telephoto lens, you can focus on the mural in the background while keeping the tree in the foreground out of focus. You could also try finding a higher vantage point. Over by the picnic benches, for instance, you could shoot from above, looking down on the mural. A wide-angle shot with the mural in the center is another great idea.
Now, I’m going to take a few photos with my phone so you can see what I do. For the first photo, I shot from a very low angle, pointing my phone up to create a dramatic and powerful image of the falcon. This gives it an exaggerated, imposing appearance. I used a wide-angle lens for this shot. For the second photo, I used a telephoto lens. While I stood far from the mural, I positioned the leaves of a tree close to the camera to create a shallow depth of field. The leaves are out of focus, while the mural in the background is sharp. This technique adds depth to the image.
Next, I’m heading over to another mural that’s been here for a long time. Behind me is a large mural, and I’ll share some ideas on how you could photograph it. To capture the entire mural, a wide-angle lens works best. You could also experiment with a panoramic shot. Another idea is to focus on details. For example, you could zoom in on specific parts of the mural that stand out to you.
For this mural, I took a wide-angle shot with my iPhone. I cropped the image slightly in Lightroom and made sure to straighten the horizontal and vertical lines for a clean composition. Then, I used a black-and-white filter in VSCO to make the image look more dynamic. In another shot, I focused on a specific detail—the cross with the sun behind it, which could represent either a sunrise or sunset. The cross is significant to the school’s history and culture. I enhanced the colors in this photo using a vibrant filter in VSCO to make them pop.
Now, here’s another example: a mural painted on some steps. To photograph this, I could get really low with a wide-angle lens or even place someone on the steps for a sense of scale. Since I’m in bright sunlight, I’m thinking about how to create a visually appealing image. I might shoot straight up or use the railings as leading lines. The shadows and diagonal lines created by the railings could add interest and movement to the image.
For the mural on the steps, I was looking for a way to frame the scene. I used the leaves of a nearby tree to create a natural frame and made the colors cooler for a different feel. In another shot, I focused on the strong diagonal lines of the railings to convey movement, which mirrors the act of going up and down the stairs. I used VSCO to warm up the colors and create a dynamic, energetic mood.
These are just a few ideas for photographing murals. Hopefully, this inspires you to try new techniques and capture unique perspectives!