Create Stunning Reflections Easily
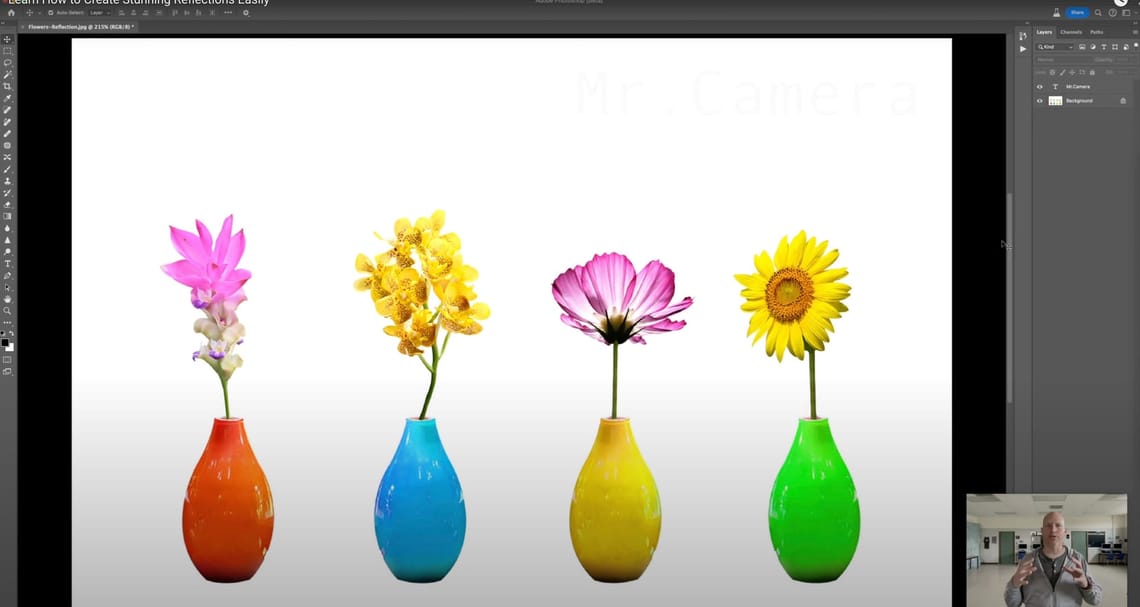
Hello, welcome! I’m going to show you how to put reflections onto something. We’ve got some flowers here. This is a tutorial in Photoshop that I’m showing you. There are lots of different ways to do this.
First, we are going to zoom out. Basically, we want to make this smaller because we’re going to be working around this image. The way I’m going to do it on my screen is down here. I can put in any value I want. I’m going to put 150 on my computer just to make it smaller for the time being.
The next thing you’re going to want to do is go to the Crop Tool. You’ll probably need to do this if you have different settings in here. The fastest way to reset it to default is to click this little arrow right here. I don’t have anything in the values, so it’s not going to be an issue for me.
Now I’m going to go to this bottom icon right here, which is actually an Adjustment Layer. We’re going to click on this adjustment layer and select Solid Color Adjustment Layer. We’re going to make it completely white. You can go out into the corners, or if you want, write down six “Fs” (FFFFFF) that you can see right there, so the layer is completely solid white. Select OK.
The next thing you’re going to want to do is drag this layer underneath your background layer. Now, if you see an actual lock right here, you’ll want to unlock the layers so you can put things underneath the layer. Click the lock to unlock it, and bring the adjustment layer (the solid white one) underneath the image of the flowers.
Next, we’re going to take this layer right here, the adjustment layer, and extend it to about 1500 pixels. Depending on what you’re doing, think about where you want your reflection to be. Right here, I’m going to put the reflection under the flowers. I might have to change that amount if I’m not sure, but I know that 1500 pixels should work.
Up here, it says Transparent. I’m going to change that to Content-Aware Fill because there’s white all around it. It should give me just white. There might be an error, but we’re not going to worry about it. Then, click Enter/Return. Here’s the error—that’s okay. Now that we have that, select the Enter check mark to get rid of the working crop tool, even though it’s selected.
Now, we’re going to select the flower layer (it says Layer 0). That’s our flowers. Next, we’ll go to the Marquee Tool. Make sure it’s the Rectangle Marquee Tool. We need to start preparing for our reflection, so we’ll select just the vases. Make sure to get all the vases and just the right amount. You might have to do this a couple of times to get it right.
We’ve got just the top of the vases. I’m going just a tiny bit higher. Notice it’s not quite going to the very bottom. Because I have just a little bit of the green vase selected, I’m going to go a tiny bit farther on the red one. Notice the bottom of it. That way, I can move it over to the right side just a little bit.
I’m going to use my keyboard arrows to move that selection over slightly so it covers all the vases and nothing else. Now, the next thing is to go a tiny bit higher. Then, go to Layer > New > Layer Via Copy. Don’t choose Cut because that will cut the original. We’re copying this selection.
Now, you’ll see another layer created on top of the others, containing just our selection with white around it. Next, go to Edit > Transform > Flip Vertical. This will flip the copied layer of the vases upside down.
Now you can see the new layer is still there, on top of the original. This is important: we’re going to move these flipped vases down to create our reflection. Hold down Shift on the keyboard (after selecting the Move Tool) to ensure the movement is straight and doesn’t go left or right. Drag the reflection down until it meets the bottom of the original vases, making it look like a reflection.
Get as close as possible and adjust it until it looks right. Once it’s positioned, the next step is to add a Layer Mask. Select the layer with the reflection and click the square icon with a circle inside to add the mask. Now, the layer mask is selected.
The last step is to go to the Gradient Tool. Drag the gradient upward from the bottom of the reflection. Notice how the gradient softens the reflection. Drag it up toward the middle of the vases to create the desired effect.
And there you go! You’ve added a reflection. If you’re saving the image, save it as a JPEG if it looks perfect and you don’t need the layers. If you’re unsure or want to keep working, save it as a Photoshop file to preserve the layers. That’s how you add a reflection in Photoshop!


